Reviewing an incident report on the Events page
IMPORTANT The procedures described in this article can be performed by Datto partners only.
With the Datto SaaS Defense Report Threat application installed, an end user has the ability to report a threat incident within each email. When an end user submits a report, it appears on the Datto SaaS Defense Events page.
IMPORTANT The Reporting a threat incident article includes end user instructions for reporting a threat incident. It is important that you provide it to your clients and review the instructions with them. This ensures that clients understand their threat incident reporting tasks.
Reviewing an incident
It is imperative that you review the incident reports your end users submit.
The Events page lists the records for which an end user has submitted an incident report and is the page on which you review the incident information. Information on the Events page includes the date and time the report was submitted, the name of the client, and the specific reason for which the end user is reporting the incident.
The information provided for each record on the Events page is described in the table below.
| Column | Description |
|---|---|
| Report Date | The date and time the end user submitted the report. |
| Client | The name of the client. |
| User Inbox | The user inbox email address. |
| Report Reason | The specific reason for which the end user is reporting the incident. |
| Client | The device from which the end user is reporting the incident. |
| Subject | The content in the email's Subject line. |
You can perform the following actions for each report:
- Quarantine the email: This action quarantines the email. An auto-generated email is sent to the end user indicating the email identified in the incident report has been quarantined.
- Block the sender: With this action, you temporarily block emails sent by the address indicated in the From field. SaaS Defense blocks the sender's emails for three days. This allows you to investigate and determine whether to configure a specific email rule placing the sender on a blocklist. At the end of three days, the temporary block is removed.
- Search in Live Search: This action performs a live search based on the address in the From field and the date in the Report Date field. The Live Search page lists all the sender's emails received by end users on the Report Date so you can quarantine the desired emails.
The Events page toolbar allows you to select filtering options to display only the reports that match the options you select.
Search box
You can search for reports submitted by a specific client or end user by entering the client's name, user's email address, or the email subject in the Search box, which is not case-sensitive. As you enter text in the Search box, the page results begin to filter.
In this example, the search lists reports based on the user's email address.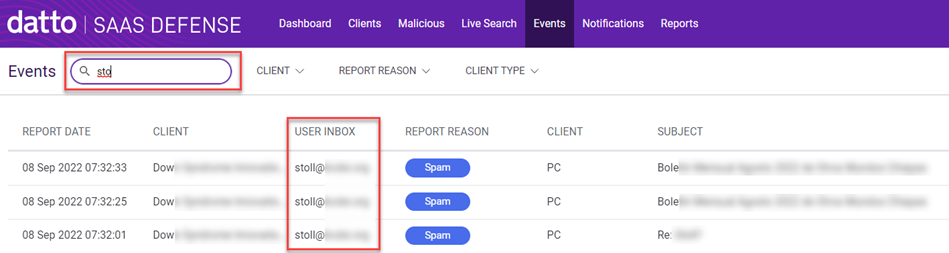
Filters
The following table describes each filter on the Events page:
| Menu | Description |
|---|---|
| Client | Lists the names of each of your clients. |
| Report Reason | Lists the possible reasons for which a client is reporting an incident. |
| Client Type | Lists the devices/platforms from which a client is reporting an incident. |
Perform the following steps to review a submitted report:
- In Datto SaaS Defense, on the Main menu, click Events.

- If desired, on the Events page toolbar, select filtering options. For more information, see the articles Filtering page results and Using the Calendar tool.
- If desired, click the Subject column header. Click From or To to display the corresponding information in the column.

- To quarantine the email:
- For the desired report record, hover over the end of the row and click the Quarantine Scan icon.
- In the confirmation dialog box, click Yes. An auto-generated email is sent to the end user indicating the email identified in the incident report has been quarantined.
- To temporarily block emails sent by the From address:
- For the desired report record, hover over the end of the row and click the Block Sender icon.
- In the confirmation dialog box, click Yes.
- To perform a live search using the From address:
- For the desired report record, hover over the end of the row and click the Search in Live Search icon.
- In the confirmation dialog box, click Yes.
- Quarantine the desired email(s). See the article Performing a live email search.


